
You already know what BC-Bench is and why it matters. Now it’s time to get your hands dirty. This guide walks through the complete setup: from installing the toolchain to running your first agent evaluation and interpreting the results.
Heads up: full evaluations require a Windows Server VM with BC containers. But you can start generating patches from any machine with Python and the agent of your choice. We cover both paths.
Setting up the environment
BC-Bench uses uv as its Python package manager (replacing pip and venv). The minimum stack you need:
# Clone the repositorygit clone https://github.com/microsoft/BC-Bench.gitcd BC-Bench# Install Python 3.13 and dependenciesuv python installuv sync --all-groupsuv run pre-commit install# Verify the installationuv run bcbench --help
You should see the CLI with five commands: collect, dataset, evaluate, result, and run. If they show up, you’re ready.
For whichever agent you plan to use, you’ll need the corresponding API keys in your .env:
# Claude Code (requires Node.js 22+)ANTHROPIC_API_KEY=sk-ant-...# GitHub Copilot CLIGITHUB_TOKEN=ghp_...# mini-bc-agent (Azure AI Foundry)AZURE_API_KEY=...AZURE_API_BASE=...
Explore the dataset before you launch anything
This step is worth the time. Understanding what you’re evaluating against makes interpreting results much easier later.
# List the 101 entriesuv run bcbench dataset list# Inspect a specific entryuv run bcbench dataset view microsoft__BCApps-4822 --show-patch# Interactive TUI with split viewuv run bcbench dataset review
Each entry has an instance_id (like microsoft__BCApps-4822), a base_commit (the state before the fix), project_paths (the AL directories affected), and FAIL_TO_PASS tests that must fail without the fix and pass with it. Problem statements include reproduction steps and screenshots — real developer reports, not abstract descriptions.
Pay attention to the environment_setup_version field. It tells you which BC version the entry needs (for example, «26.0» for BC 2025 Wave 1). Entries sharing a version can reuse the same container, which saves a lot of setup time.
Your first run: generate the patch without a container
The fastest way to get started is the run command, which just executes the agent and captures the generated patch. No BC container required: just the agent, the dataset, and a local clone of BCApps.
# With Claude Codeuv run bcbench run claude microsoft__BCApps-4822 \ --category bug-fix \ --model claude-sonnet-4-6 \ --repo-path /path/to/BCApps# With GitHub Copilot CLIuv run bcbench run copilot microsoft__BCApps-4822 \ --category bug-fix \ --model claude-sonnet-4.6 \ --repo-path /path/to/BCApps
Watch out for the model ID format: Claude Code uses hyphens (claude-sonnet-4-6), Copilot uses dots (claude-sonnet-4.6). Same model, different naming convention.
The output is a JSONL file with the generated patch, token usage, execution time, number of turns, and a tool-usage breakdown. You can review patch quality manually even without running the full pipeline.
Full evaluation: compile, test, resolve
When you’re ready for the real thing, you need a Windows Server VM with Docker, Hyper-V, and a BC container. The framework includes setup scripts in two phases:
Phase 1 installs the Windows features (Hyper-V, Containers), disables Defender real-time scanning (which noticeably impacts BC compilation speed), and reboots the machine.
Phase 2 installs the full stack: Docker, PowerShell 7, Git, Python via uv, Node.js, Claude Code, Copilot CLI, BcContainerHelper, and the AL Tool. It also configures environment variables and clones BC-Bench.
Once the VM is ready:
# Create the BC container and check out the repo at the correct commit.\scripts\Setup-ContainerAndRepository.ps1 ` -InstanceId "microsoft__BCApps-4822" ` -ContainerName "bcbench"# Run the full evaluationuv run bcbench evaluate claude microsoft__BCApps-4822 ` --category bug-fix ` --model claude-sonnet-4-6 ` --container-name bcbench ` --username admin ` --password "YourPassword123!" ` --al-mcp ` --run-id my_first_eval
The –al-mcp flag gives the agent access to the AL compiler via MCP during execution. That means the agent can compile its own changes and get real error feedback instead of working blind. It requires the AL Tool to be installed as a dotnet tool.
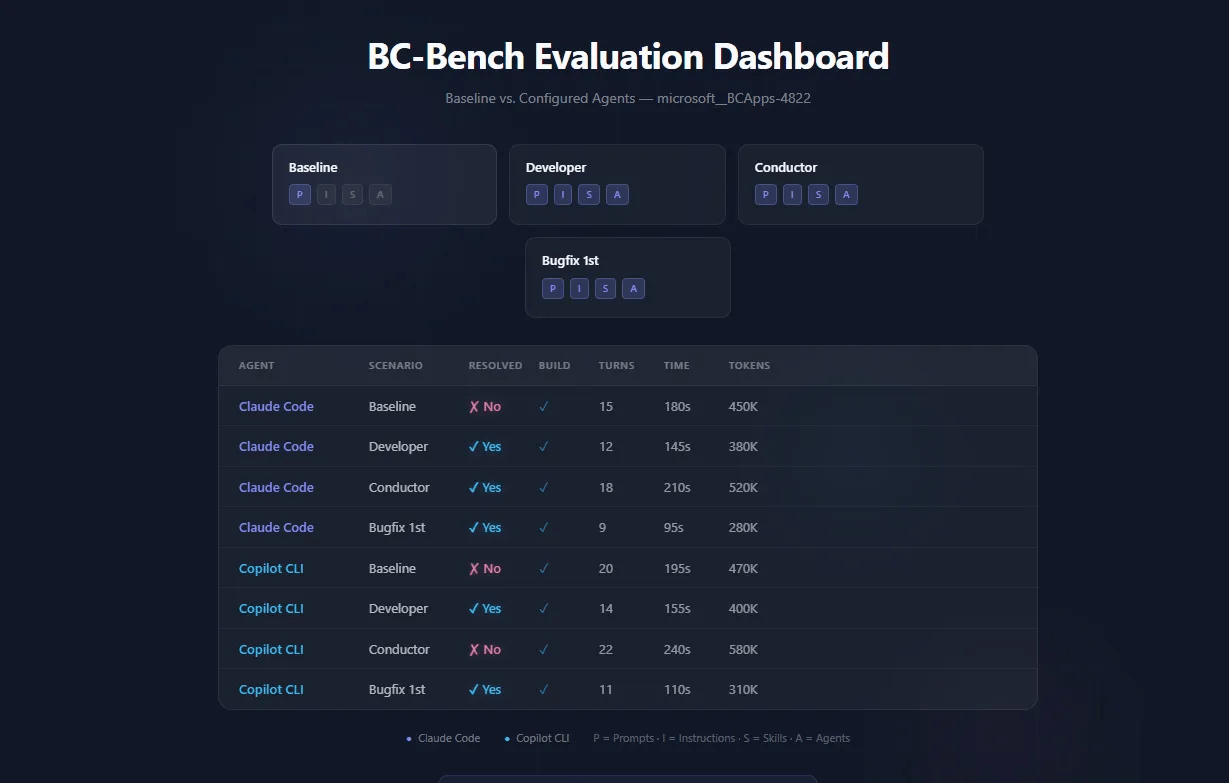
Designing your first comparison
The real value of BC-Bench isn’t in a single run, it’s in comparing configurations. The framework’s config.yaml controls four independent levers:
# Instructions: toggle CLAUDE.md / copilot-instructions.mdinstructions: enabled: true # false for baseline# Skills: modular knowledge packsskills: enabled: true include: - skill-al-bugfix - skill-debug - skill-testing# Agents: custom agent definitionsagents: enabled: true name: al-developer-bench
The simplest meaningful comparison: baseline (everything off) vs. your configured agent. The script handles it in a single command:
.\scripts\Setup-ALDCEvaluation.ps1 ` -InstanceId "microsoft__BCApps-4822" ` -CompareBaseline
This runs two rounds: first with all customization disabled, then with whatever is active in config.yaml. Same bug, same model, same container — only the agent configuration changes. That’s your first controlled experiment.
For the full matrix (4 scenarios × 2 agents = 8 runs):
.\scripts\Run-FullComparison.ps1 ` -InstanceIds "microsoft__BCApps-4822" ` -LlmFamily sonnet ` -PauseBetweenScenarios 180
The pause parameter is practical, not decorative. API rate limits are real, and 3 minutes between scenarios prevents overloaded_error responses that waste your evaluation time.
Reading the results
Results live in JSONL files, one JSON object per evaluated instance. Key fields:
- resolved: did the agent’s fix pass all tests?
- build: did the code compile?
- metrics.turn_count: how many interaction turns the agent needed
- metrics.prompt_tokens / completion_tokens: token consumption
- experiment: the exact configuration used (for reproducibility)
The CLI gives you aggregated views:
# Summary statisticsuv run bcbench result summarize my_first_eval# Aggregate results from a directoryuv run bcbench result aggregate --input-dir notebooks/result/bug-fix/# Interactive failure review (TUI with gold vs. generated patch)uv run bcbench result review results.jsonl --category bug-fix
The failure review TUI is particularly useful. It shows a split view with the expected patch on one side and the agent’s on the other. You can classify failures by category (j/k to navigate, 1-7 to tag), which builds intuition about where and why agents get things wrong.
For visual analysis, the included Jupyter notebooks cover agent-vs-agent comparisons, failure patterns, AL MCP impact, and configuration effectiveness:
uv sync --group analysisuv run jupyter lab notebooks/bug-fix/overview.ipynb
Three things that will trip you up
Container version. If the container’s BC version doesn’t match the entry’s environment_setup_version, compilations will fail in confusing ways. Always let Setup-ContainerAndRepository.ps1 handle container creation: it reads the version straight from the dataset.
Agent loops. The default timeout is 60 minutes. If an agent gets stuck in a loop (retrying the same approach over and over), it will burn tokens and time. The bcbench run mini-inspector command lets you review agent trajectories to diagnose that behavior. Haiku is faster than Opus: if you’re doing exploratory runs, start with the fast models.
Version incompatibility. BC-Bench uses semantic versioning, and results from different versions can’t be aggregated. It’s intentional: it prevents comparing results generated under different evaluation conditions. If you update the framework, you need to re-run your baselines.
Building your own agent profile
If you have AL coding standards, debugging workflows, or domain knowledge specific to your organization, you can build custom agent profiles:
- Write a markdown file with YAML frontmatter (name, description, tools, model, maxTurns)
- Place it in your repository’s agents directory
- Register it as a profile in config.yaml
- Run the evaluation with your new agent active
The same applies to skills (a directory with a SKILL.md) and custom instructions (a markdown file that becomes CLAUDE.md or copilot-instructions.md).
The framework is MIT licensed. Fork it, adapt the agent definitions to your team’s needs, and build your own leaderboard. That’s exactly what it’s for.
A note on what it takes to put this together
Documenting BC-Bench at this level doesn’t happen in one afternoon. This guide is the result of a handful of late-night sessions over ten days, carving hours out of rest after the regular workday, plus more than €40 in Claude API calls iterating on the content. I mention it because if you’re weighing whether it’s worth investing time in standing up your own evaluation environment, you deserve a realistic reference for the effort involved.
The repository that accompanies this guide exists precisely so you don’t have to start from scratch.


Deja un comentario